
MPE in FL Studio
FL Studio has no MPE in its piano roll: one pitch bend moves every note on the channel, and there is no per-note pressure or slide. As of September 2026 that has not changed, and Image-Line has not announced it. You can still get real MPE inside FL today. This page covers what FL can and cannot do, the three ways people get around it, and the full setup for the one we make.
Does FL Studio support MPE?
No. FL Studio loads MPE-capable synths and records MIDI from an MPE controller into a pattern, but its piano roll and MIDI routing do not know what a member channel is. A pitch bend drawn in the FL piano roll is a channel message, so it bends every note on that channel at once. The same goes for aftertouch and CC74. The feature request on the Image-Line forum has been open for years; a vote there is worth a minute.
Without MIDISketch
- ✕ Per-note pitch slides and glides
- ✕ Individual note vibrato
- ✕ Microtonal bends on specific notes
- ✕ Guitar-like bends within a chord
With MIDISketch
- Draw Bezier pitch curves per note
- Host third party synths inside, Serum, Vital, Phase Plant
- LFO tool, brush tool, chord stamps, and more
- All per-note magic happens inside the plugin
Three ways to get MPE in FL Studio
- Host the synth inside a plugin that speaks MPE. The plugin loads as one FL generator, hosts Serum, Vital, Phase Plant or any MPE synth inside itself, and generates the per-note MIDI internally, so FL never has to understand it. That is what MIDISketch does, with a piano roll where you draw the bends, slides and vibrato note by note. It is the route for anyone who wants to write MPE with a mouse rather than play it in. Setup below.
- Bridge a controller through an MPE-aware plugin. If you own a Seaboard, Osmose or LinnStrument, FL will not hand its member channels to a synth by itself. Tools such as the MPE Emulator plugin or a MIDI Shape Shifter template do that for live playing. Good for performance, no help for editing afterwards, since the notes still land in a piano roll that cannot show the expression. MIDISketch records those controllers too and keeps every curve editable.
- Pitch wheel mode, one voice per instance. One synth per channel, one note at a time, a regular pitch wheel per lane. It works for a single lead line and falls apart on chords. MIDISketch has a Pitch Wheel mode that automates this for non-MPE synths such as Kontakt or Omnisphere 2 (Omnisphere 3 has MPE, so it runs in MPE mode).
Getting Started
Download & Install
Download the Windows Installer (.exe) from the MIDISketch page. The installer places the VST3 and CLAP plugins in the correct system folders automatically.
- VST3,
C:\Program Files\Common Files\VST3\ - CLAP,
C:\Program Files\Common Files\CLAP\
On a Mac, download the macOS installer (.pkg). Its choices are VST3 plugin, Audio Unit (Logic, GarageBand), CLAP plugin, Standalone app, the two MIDISketch MIDI FX options and MIDISketch Audio Send.
There is also a MIDI FX version, an option in the installer (on Windows, choose Custom installation and tick MIDISketch MIDI FX). VST3 has no MIDI-effect type, so hosts list it as an effect. Everything in this guide uses the main MIDISketch plugin.
Scan & Load in FL Studio
Go to Options → Manage Plugins → Find installed plugins (or press F10 → Plugins tab). Wait for the scan to finish.
In the Channel Rack, click + and add MIDISketch as a Generator (instrument). The MIDISketch window opens with its own piano roll.
MIDISketch sizes its window to the space FL gives it, in the VST3 and the CLAP alike, and keeps that size when you reopen it, laptops included. If the window still looks wrong on your screen, pick FILE → Copy Window Report: it puts the window’s sizes and scales on the clipboard (Window report copied - paste it to us (Discord or email)) for a support message.
Hosting Synths
This is the recommended workflow for FL Studio. Load your synth directly inside MIDISketch, all per-note pitch bending is handled internally, no external routing needed.
- Click the Synth button in MIDISketch's toolbar to open the plugin browser.
- Load any VST3 synth, Serum, Vital, Phase Plant, Pigments, Surge XT, or anything installed on your system.
- Inside the hosted synth, enable MPE mode and set its pitch bend range to match MIDISketch's, 48 by default.
Vital
On the Advanced tab, turn on MPE (bottom left) and set the bend range (bottom right) to
48.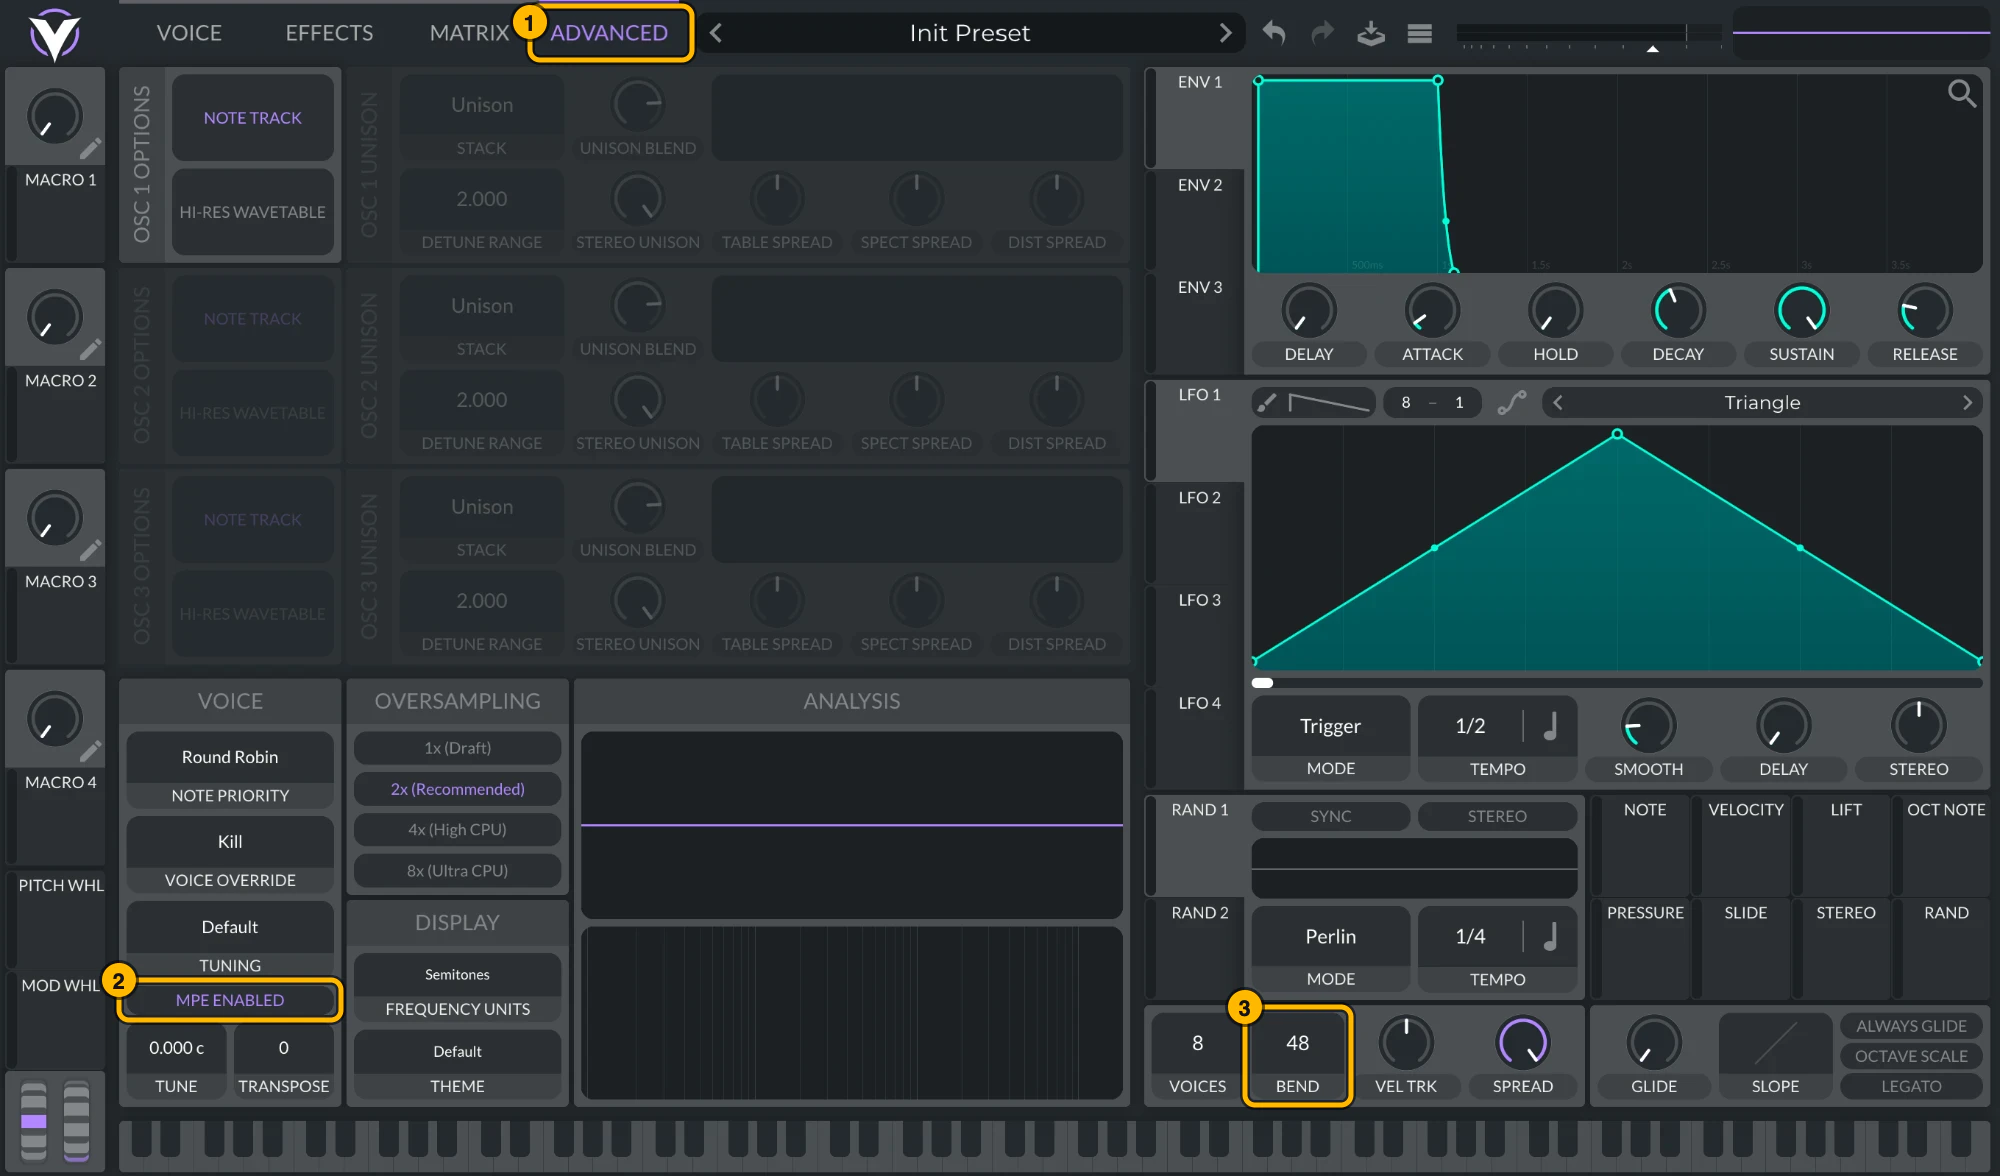
Vital: (1) Advanced, (2) MPE Enabled, (3) bend range 48. Click to see it full size. Serum 2Serum 2 ships with MPE on and a bend range of
48. To check, open its menu: MPE Enabled should be ticked and the MPE bend range at48. To keep MPE on in every new Serum 2, tick MPE enabled by default under Global settings › MPE.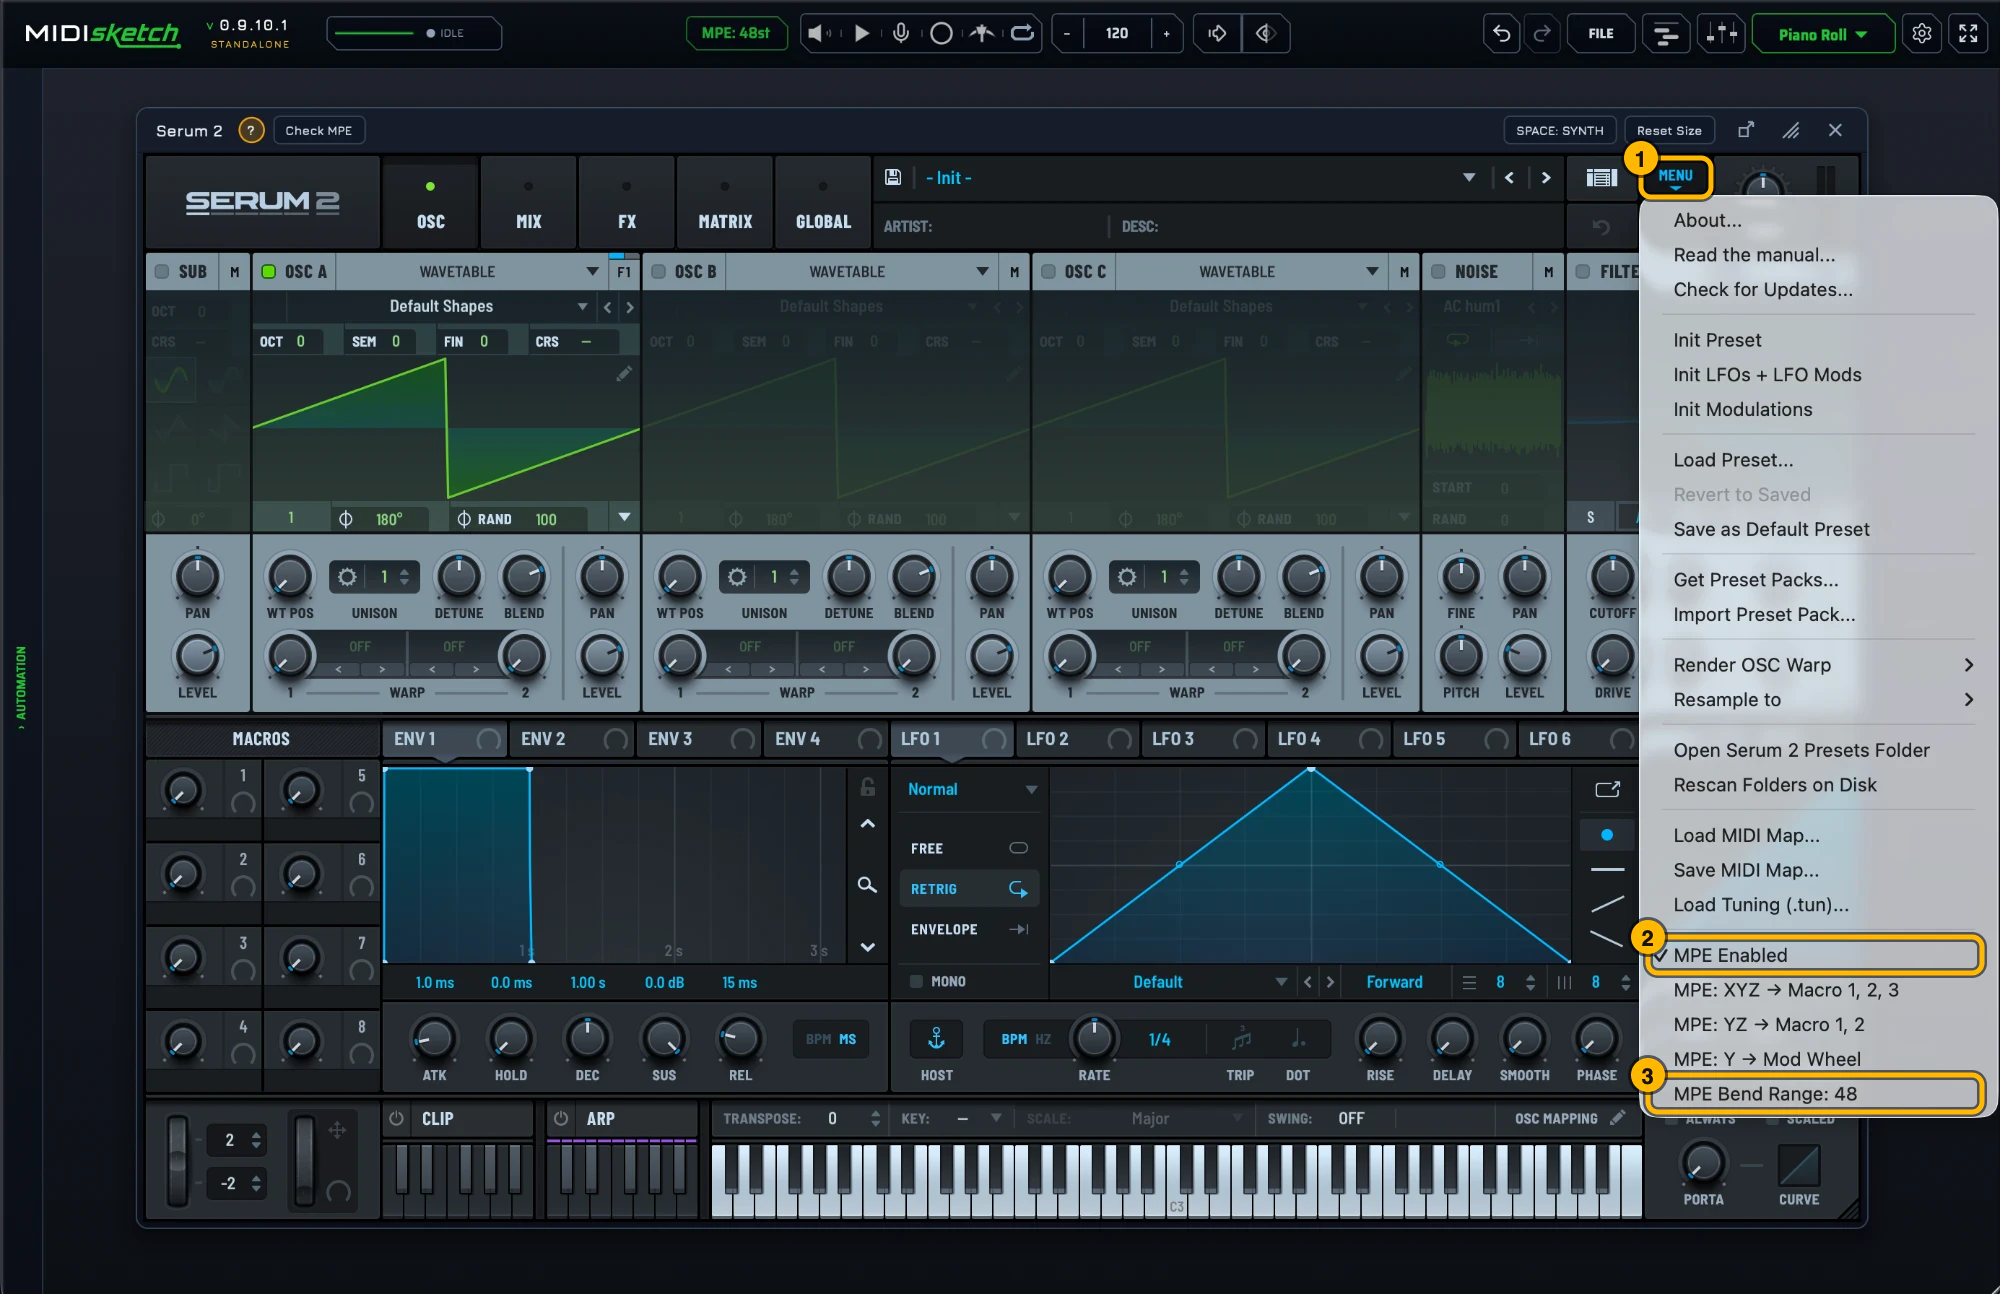
Serum 2's MPE settings. Click to see it full size. - Not sure of the synth's MPE settings? With it loaded, the strip under the synth shows a green ? with that synth's MPE steps (general tips if there is no guide for it) and Check MPE, which tests a hidden copy of the synth: is MPE on, does its bend range match MIDISketch's, does it react to pressure and slide. If a synth is missing from the browser, Scan for all VSTs... in its menu finds every installed plugin; the scan doesn't run on its own.
- Place notes in MIDISketch's piano roll. Double-click a note to add pitch points. Drag points to create bends, glides, and vibrato.
- Press play in FL Studio. Everything plays through the hosted synth in real time, FL Studio treats MIDISketch as a regular instrument.
Crackling or High CPU? Fix FL's Buffer Slicing
Performance & Latency
If your CPU spikes or audio crackles when playing heavy patches in hosted synths (like Serum or Vital), the culprit is almost always FL Studio's variable buffer processing.
The Problem: Buffer Slicing
By default, FL Studio slices audio processing into tiny, variable fragments (often 30-200 samples), regardless of your main buffer setting.
Every synth has a fixed CPU overhead just to start rendering an audio block. When fed tiny slices, your synth spends most of its time on setup overhead instead of audio generation. Raising your buffer length in Audio Settings alone won't solve this because FL keeps slicing.
The 1-Click Fix
- Click the Gear icon (top-left of the MIDISketch plugin wrapper) → select the Troubleshooting tab (wrench icon).
- Turn ON:
Use fixed size buffers. This forces FL to deliver constant full-size blocks. - In the More dropdown next to it, ensure both
Process maximum size buffersandUse maximum buffer size from hostare checked (default).
Diagnostic Tool: In-Plugin Performance HUD
Verify your buffer delivery and detect audio overruns. Shortcut: F10.
With the MIDISketch window focused, press F10 to toggle the real-time performance readout:
Before Fixed Buffers: The top line displays erratic, tiny sample deliveries (e.g., ...of 30smp) alongside a constantly climbing overrun counter.
After Fixed Buffers: Shows steady, full-size buffer blocks with zero overruns. The synth line reflects your hosted synth's actual compute cost.
Typing into Your Synth Without Triggering FL Shortcuts
Workflow & Controls
In older setups, searching presets inside a hosted synth (like Serum's browser) would accidentally trigger FL Studio global shortcuts, pressing R would toggle recording mid-word.
Automatic Keystroke Interception
Current builds of MIDISketch intercept keyboard input aimed at the hosted synth before FL Studio captures it. Preset searches, typing names, and text input work seamlessly out of the box.
Required Wrapper Setting
In the MIDISketch wrapper settings (Troubleshooting tab), keep "Allow FL Studio to process keyboard presses..." turned OFF (default). Turning this on passes keys back to FL's hotkey system.
Recommended FL Wrapper Settings
One-glance summary for optimal performance, transport synchronization, and input focus in FL Studio (Plugin Wrapper Settings → Troubleshooting tab).
Use fixed size buffers, ON. Prevents buffer slicing, eliminates CPU spikes & crackling.More: Process maximum size buffers, ON (default). Processes audio in full buffer blocks.More: Use maximum buffer size from host, ON (default). Syncs buffer sizing with FL Audio settings.
Send loop position, ON. Enables transport, timeline, and loop sync with FL Studio.Allow FL to process keyboard presses..., OFF. Prevents FL shortcuts when typing into synth preset searches.Use time offset / Fast idle, OFF. Not required for normal operation.
Routing to a Synth on Its Own Channel
If you would rather keep a synth on its own Channel Rack slot and mixer track than host it inside MIDISketch, FL can carry MIDISketch's output to it through the plugin wrapper's MIDI ports. This route sends standard pitch wheel data on one channel, not per-note MPE, so a bend moves every note sounding at the same time. It suits monophonic leads, basses and single-note bends.
Routing Steps
- Load MIDISketch as a Generator in the Channel Rack, and load your VST synth in its own Channel Rack slot.
- In MIDISketch, open the settings gear → MIDI Settings.... On the MIDI OUT tab, under WHERE NOTES GO, check that MIDI Output is on (it is by default). On the MPE & PITCH tab, under MODE, pick Pitch Wheel, then set Bend Range (default 12) to the one your synth uses. The card says “All notes on ch1.”
- Open MIDISketch's wrapper settings (the gear at the top of its plugin window), MIDI section, and set Output port to a number no other plugin uses, say 1.
- Open the synth's wrapper settings, MIDI section, and set Input port to the same number.
- Check the synth's pitch bend range matches MIDISketch's, then write notes and pitch curves as usual.
A new MIDISketch plays its built-in synth, and MIDI Output and Internal Audio are both on by default, so the MIDISketch track keeps sounding next to the routed synth. To hear only the other synth, turn off Internal Audio (settings gear → MIDI Settings... → MIDI OUT → WHERE NOTES GO) or click the speaker left of Play.
There is no MIDI Out plugin in this chain. FL's MIDI Out plugin plays its own piano roll to a port; it has nothing to do with what MIDISketch sends, and adding one would only double the notes.
Tested Synths
- Serum
- Serum 2
- Vital
- Phase Plant
- Pigments
- Surge XT
- Diva
- Hive 2
+ any VST3 synth with MPE support
MIDISketch on FL's Playlist
MIDISketch sits in the Channel Rack and plays its own sketch, in time with FL's transport while its playback mode is AUTO, so it plays along with your Playlist (Start at bar and Loop count are in the playback cog). Three ways to arrange it there:
- Trigger mode: click TRIGGER in MIDISketch's playback bar, put a note in an FL pattern on MIDISketch's channel and place that pattern on the Playlist. The sketch plays from the start when FL reaches the note, loops while it is held and stops when it ends, so the Playlist decides when it plays. See Trigger Mode.
- Drag the notes out: FILE → Export... has a Drag to your DAW zone. The Note steps format writes bends as runs of semitone notes for FL's piano roll. See Export.
- Arrange inside MIDISketch: its own Playlist holds patterns and clips, and follows FL's song clock.
Quick Tips
- Host synths inside MIDISketch for per-note pitch bending, this is the recommended FL Studio workflow.
- Turn ON
Use fixed size buffersin the wrapper Troubleshooting tab to eliminate audio crackling and high CPU spikes. - Press
F10with MIDISketch focused to open the real-time buffer & performance diagnostics HUD. - The playback bar’s Space: pill picks what Space does, PLUGIN (the default) or DAW. PLUGIN plays MIDISketch’s own playback. If FL is already playing, Space stops FL first (a message says so) and the next Space plays MIDISketch; in Trigger mode, Space plays MIDISketch over FL instead. DAW passes Space on to FL to start and stop its transport, on Windows and Mac. The pill is hidden in the standalone and when the bar is too narrow, and the setting saves with the project.
- Match the pitch bend range between MIDISketch and your synth. 48 is MIDISketch's MPE default, not a requirement.
- Keep "Allow FL Studio to process keyboard presses..." OFF in wrapper settings to type cleanly in synth preset searches.
- Port routing to a VST on its own channel sends single-channel pitch wheel only, useful for mono leads, not chords, and it cannot reach FL's own plugins such as Slicex or Sytrus.
- Use the Standalone app to sketch ideas without opening FL Studio.
- MIDISketch works with any VST3 synth installed on your system.
Muting MIDISketch in FL Studio
The green light in FL’s Channel Rack does not silence MIDISketch. FL keeps running the plugin and sending its sound to the mixer; the light only stops the pattern’s notes, and MIDISketch plays the notes on its own roll in time with FL, so they keep sounding. FL gives plugins no signal for that light, so mute MIDISketch one of these ways:
- The speaker in MIDISketch’s transport, just left of the Play button, mutes its sound: the built-in synth, the Sampler, the SF Loader or a synth loaded inside it. Its MIDI keeps going, so a synth on another channel that MIDISketch drives still plays.
- Playback OFF: set the playback mode in the playback bar (AUTO / TRIGGER / OFF) to OFF, and MIDISketch sends no notes at all, to a synth inside it or on another channel. Switch back to AUTO to hear it again.
- The mixer: mute the FL mixer track MIDISketch is routed to.
FL Studio MPE questions
Does FL Studio support MPE?
No. FL Studio has no MPE support in its piano roll or MIDI routing. Per-note pitch bend, pressure and slide need a plugin that generates MPE internally and hosts the synth, which is what MIDISketch does.
Can the FL Studio piano roll do per-note pitch bend?
Not on its own. Pitch bend in the FL piano roll is a channel message, so it moves every note on that channel. Per-note bends need MPE, drawn in MIDISketch's roll and sent to the synth it hosts.
How do I use Serum or Vital with MPE in FL Studio?
Load MIDISketch as a generator, load Serum or Vital inside it with the Synth button, enable MPE in the synth and set its pitch bend range to 48 semitones. Then draw pitch curves per note in MIDISketch. The steps above walk through it.
Can I use FL Studio's Playlist with MIDISketch?
Yes. Trigger mode is the main way: click TRIGGER in MIDISketch's playback bar, put a note in an FL pattern on MIDISketch's channel and arrange that pattern on the Playlist, and the note plays the sketch. You can also arrange inside MIDISketch's own Playlist, which follows FL's song clock, or drag the notes out with FILE → Export... into a pattern. In AUTO, the default, MIDISketch simply plays along with FL's song position. See MIDISketch on FL's Playlist.
Will FL Studio add MPE support?
Image-Line has not announced it. The feature request on their forum has been open for years and gathers votes; nothing in a released version of FL Studio handles MPE as of September 2026.
Guides for Other DAWs
VST3 + CLAP · Windows & macOS · Lifetime License